Pedestrian detection using YOLOv3
Owning a quality camera can be fairly useful by itself. Video stream can provide a lot of information not easily comprehendable by just using various sensors. However, not always there is a human eye to make a sense of it. Therefore, additional algorithms can be implemented to provide a lot of insights automatically. A lot of them can be extracted and tracked using detection algorithms.
There are plenty of algorithms to detect objects of a choice in a photo or a video frame. Last five years saw a rise of convolutional neural networks. Their novel architecture enabled to make a detection model to learn high level abstracts by itself, only by using pictures as input data. However, there are a lot of different machine learning models, all incorporating convolutions, but none of them are as fast and precise as YOLOv3 (You Only Look Once). Differently from most of its competitors, it is built in a way that whole image is processed at once. That enables algorithm to work much faster while still offering comparable detection quality.
Prerequisites
There are several things to be installed before a start. You should have a GCC toolchain installed on your computer. Latest OpenCV version is also required if one opts to use the tools for displaying images or videos. OpenCV should be compiled for applicable Nvidia GPU if one can be used. Python isn’t required, but highly advised for image dataset manipulations, anchor box generation and other things. Lastly, if Nvidia GPU is used and CUDA with Compute Capability >3.0 is supported it is highly advised to also install CUDA and CuDNN libraries to make execution much faster.
To download files needed to run YOLO, visit https://github.com/pjreddie/darknet. Use git to clone files or just download all the latest files if you don’t intend to switch between commits when there’s a newer version. Alternatively, you can download YOLOv3 files from https://github.com/AlexeyAB/darknet which also contain additional options and instructions about how files should be compiled, how images and videos can be processed as well finetuning on a custom dataset.
Transfer learning
Finetuning, or transfer learning, is what we need. Deep neural networks are a lot of times trained from scratch using huge datasets such as ImageNet (containing millions of images) and usually generalize well for a huge amount of classes. However, we usually don’t need most (if not all) of them and sometimes we need classes that are not in these huge datasets. Training network from scratch on a small custom batch of images would result in overfitting – poor generalization in real life conditions even though training accuracy would be very high. Turns out a lot of images share some similarities and features for one object detector usually work well while searching for another object. That means only several last layers could be retrained, taking the rest of neural network as an already built feature extractor.
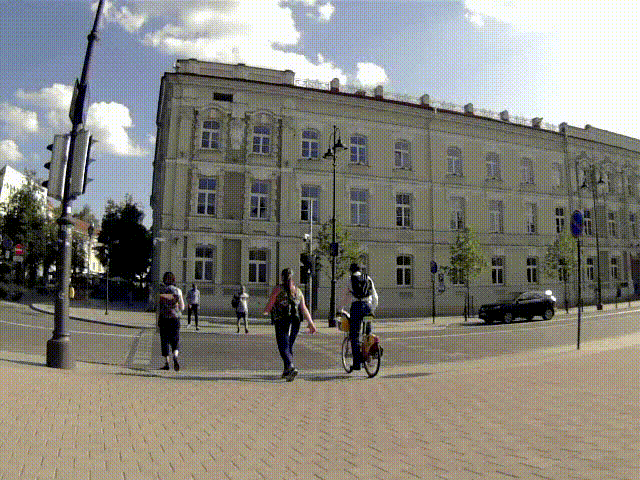
Below there are instructions on how to compile YOLOv3, do finetuning step on custom dataset and get test results. To make everything more visual and therefore more understandable a particular use case is selected – detecting pedestrians.
Kurokesu C1 camera is used to show the synergy of several technologies.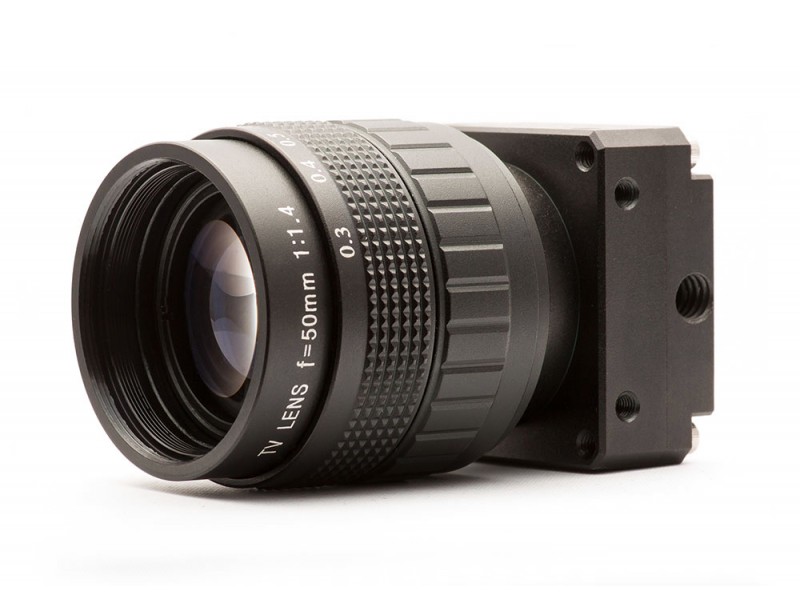
Compilation
YOLO is highly configurable detection framework and its compatibility with existing hardware is ensured by making changes to Makefile and doing make in the darknet repository directory. After any changes to Makefile you should recompile code to use it. All the options you can set (some of them are only supported by AlexeyAB repository):
- `GPU=1` to build with CUDA to accelerate by using GPU (CUDA should be in `/usr/local/cuda` for Linux)
- `CUDNN=1` to build with cuDNN v5-v7 to accelerate training by using GPU (cuDNN should be in `/usr/local/cudnn` for Linux)
- `OPENCV=1` to build with OpenCV 3.x/2.4.x – allows to detect on video files and video streams from network cameras or web-cams
- `DEBUG=1` to build debug version of YOLO
- `OPENMP=1` to build with OpenMP support to accelerate Yolo by using multi-core CPU
Weights file available for download was trained using ASUS GeForce GTX1080Ti GPU with GPU, CUDNN and OPENCV flags set.
If you own a computer with Microsoft Windows installed and don’t intend to use console and `make`, you can compile on Windows using instructions provided in AlexeyAB repo:
- If you have MSVS 2015, CUDA 9.1, cuDNN 7.0 and OpenCV 3.x (with paths: `C:\opencv_3.0\opencv\build\include` & `C:\opencv_3.0\opencv\build\x64\vc14\lib`), then start Microsoft Visual Studio (MSVS), open `build\darknet\darknet.sln`, set x64 and `Release` and do the: `Build -> Build darknet`. NOTE: Use OpenCV 3.4.0 or earlier. There is a bug in OpenCV 3.4.1 in the C API.
- Find files `opencv_world320.dll` and `opencv_ffmpeg320_64.dll` (or `opencv_world340.dll` and `opencv_ffmpeg340_64.dll`) in `C:\opencv_3.0\opencv\build\x64\vc14\bin` and put it near with `darknet.exe`
- Check that there are bin and include folders in the `C:\Program Files\NVIDIA GPU Computing Toolkit\CUDA\v9.1` if aren’t, then copy them to this folder from the path where is CUDA installed
- If you want to build without CUDNN then: open `\darknet.sln` -> (right click on project) -> properties -> C/C++ -> Preprocessor -> Preprocessor Definitions, and remove this: CUDNN;
- If you have other version of CUDA (not 9.1) then open `build\darknet\darknet.vcxproj` by using Notepad, find 2 places with “CUDA 9.1” and change it to your CUDA-version, then do step 1
- If you don’t have GPU, but have MSVS 2015 and OpenCV 3.0 (with paths: `C:\opencv_3.0\opencv\build\include` & `C:\opencv_3.0\opencv\build\x64\vc14\lib`), then start MSVS, open `build\darknet\darknet_no_gpu.sln`, set x64 and Release, and do the: Build -> Build darknet_no_gpu
- If you have OpenCV 2.4.13 instead of 3.0 then you should change paths after `\darknet.sln` is opened
- (right click on project) -> properties -> C/C++ -> General -> Additional Include Directories: `C:\opencv_2.4.13\opencv\build\include`
- (right click on project) -> properties -> Linker -> General -> Additional Library Directories: `C:\opencv_2.4.13\opencv\build\x64\vc14\lib`
Note: CUDA must be installed only after that MSVS2015 had been installed.
Getting dataset ready
You can use pretty much any dataset you want. However, there are several things to make sure your algorithm will do well when testing:
- Choose dataset with as many examples as there is possible. Usually several hundreds for one class is a good start
- Make sure photos are diverse in lighting, object rotation and size
- Some photos should include occluded objects
A great dataset for pedestrian detection is called Caltech Pedestrian Dataset. It consists of 350.000 bounding boxes for 2300 unique pedestrians over 10 hours of videos.
To use a dataset for training it has to be in a precise format to be interpreted by training function. If you’re collecting data by yourself you must follow these guidelines. If you’re using a publicly available dataset chances are you can find converters capable of changing formats of images and their annotations. For Caltech Pedestrian Dataset you can first convert it to VOC and later to YOLO format. To get your dataset ready you should:
- Put image-files (.jpg) of your objects in the directory `build\darknet\x64\data\obj\`
- Label each object on images from your dataset (if it hasn’t been done already). To make a job a whole lot easier you can use GUI-software for marking bounded boxes and generating annotation files for YOLO.
It will create .txt-file for each .jpg-image-file – in the same directory and with the same name, but with .txt-extension, and put to file: object number and object coordinates on this image, for each object in new line: `<object-class> <x> <y> <width> <height>`
- Where:
`<object-class>` – integer number of object from `0` to `(classes-1)`. As for pedestrians (only one class) number is always zero. - `<x> <y> <width> <height>` – float values relative to width and height of image, it can be equal from (0.0 to 1.0], for example: `<x> = <absolute_x> / <image_width>’ or ‘<height> = <absolute_height> / <image_height>`.
Attention: `<x> <y>` – are center of rectangle (not a top-left corner)
For example for `img1.jpg` you will be created `img1.txt` containing:
1 0.716797 0.395833 0.216406 0.147222
0 0.687109 0.379167 0.255469 0.158333
0 0.420312 0.395833 0.140625 0.166667
Create file train.txt in directory `build\darknet\x64\data\`, with filenames of your images, each filename in new line, with path relative to darknet.exe, for example containing:
data/obj/img1.jpg
data/obj/img2.jpg
data/obj/img3.jpg
Finetuning
Steps needed to training YOLOv3 (in brackets – specific values and comments for pedestrian detection:
- Create file `yolo-obj.cfg` with the same content as in `yolov3.cfg` (or copy `yolov3.cfg` to `yolo-obj.cfg`) and:
- change line batch to `batch=64`
- change line `subdivisions` to `subdivisions=8` (if training fails after it, try doubling it)
- change line `classes=80` to your number of objects in each of 3 `[yolo]`layers (`classes=1` for pedestrian because we only have one class).
- change `[filters=255]` to `filters=(classes + 5)x3` in the 3 `[convolutional]` layers before each `[yolo]` layer. So if `classes=1` then should be `filters=18`. Only write constants, not formulas.
- Create file `obj.names` in the directory `build\darknet\x64\data\`, with objects names – each in new line
- Create file `obj.data` in the directory `build\darknet\x64\data\`, containing (where classes = number of objects):
classes= 1
train = data/train.txt
valid = data/test.txt
names = data/obj.names
backup = backup/
- Download pre-trained weights for the convolutional layers (154 MB): https://pjreddie.com/media/files/darknet53.conv.74 and put to the directory where darknet file has been compiled.
- Start training by using the command line: `./darknet detector train data/obj.data yolo-obj.cfg darknet53.conv.74`. For Windows, use `darknet.exe` instead of `./darknet`
- After training is complete – get result `yolo-obj_final.weights` from path `build\darknet\x64\backup\`. If using *AlexeyAB* repo, after each 100 iterations you can stop and later start training from this point. For example, after 2000 iterations you can stop training, and later just copy `yolo-obj_2000.weights` from `build\darknet\x64\backup\` to `build\darknet\x64\` and start training using: `darknet.exe detector train data/obj.data yolo-obj.cfg yolo-obj_2000.weights`. In the original repository (https://github.com/pjreddie/darknet) the weights-file is saved only once every 10 000 iterations if(iterations > 1000)).
To improve object detection it is a good idea to:
- Before training:
- set flag `random=1` in your .cfg-file – it will increase precision by training Yolo for different resolutions.
- increase network resolution in your .cfg-file (`height=608`, `width=608` or any value multiple of 32) – it will increase precision
- After training – for detection:
- Increase network-resolution by set in your `.cfg`-file (height=608 and width=608) or (height=832 and width=832) or (any value multiple of 32) – this increases the precision and makes it possible to detect small objects. Higher values don’t seem to work as well, at least with Caltech Pedestrian dataset. You do not need to train the network again, just use `.weights`-file already trained for 416×416 resolution. If error Out of memory occurs then in `.cfg`-file you should increase `subdivisions` to 16, 32 or 64.
Testing
Use darknet on Linux by typing `./darknet detector test ./cfg/coco.data ./cfg/yolov3.cfg ./yolov3.weights`. On Windows instead of `./darknet` use `darknet.exe`, All the other options stay the same. YOLO lets you test it on images (can run batch of them at once) and videos. Below are the results and commands used to achieve them with all needed explanations.
If you don’t intend to train a network by yourself, download obj.data file, configuration file yolo-obj3.cfg and weights file `yolo-obj_final.weights` and put them in their respective folders.
To detect pedestrians in an image:
./darknet detector test ./data/obj.data ./cfg/yolo-obj3.cfg ./yolo-obj_final.weights -tresh 0.3 ./data/horses.jpg
Not writing last arguments start an interactive mode that lets input files one after another by declaring their location in your computer.
Detecting pedestrians in a video:
./darknet detector demo ./data/obj.data ./cfg/yolo-obj3.cfg ./yolo-obj_final.weights ./zmones/my_video-11.mkv -tresh 0.3
As you can see, commands are similar and fairly straighforward. `detector` command is called for a inference phase, `test` for image, `demo` for video. The rest of arguments are configuration file, weights file, file to be tested and confidence threshold which has to be exceeded to mark object as a detection (`-tresh`). Confidence argument is optional, by default an automatic value of 0.25 is used.
Final Remarks
Results not only seem impressive, they are really useful in numerous use cases. Detection can help detect if an item is missing from the box (if there always has to be an exact amount of them) as well as make prediction if an item is fitted properly. Add a tracking-by-detection algorithm on top (such as SORT (Simple Online Realtime Tracking) and you can track moving things – people in a supermarket, cars in a parking lot and so forth.